Downstream Note 3: Interactive Visualization in Three Minutes

📢 What you'll learn in this post:
Build interactive single-cell data visualizations from scratch—no prior experience needed
Deploy to the cloud with one click and share data anytime, anywhere
A step-by-step configuration tutorial you can copy-paste and run!
Today I want to share an amazing tool for interactive visualization: ShinyCell. I've been wanting to write about this package for a long time—everyone in the lab who's tried it loves it. It lets you explore gene expression, heatmaps, and more in your single-cell data without writing a single line of code. Incredibly convenient.
ShinyCell takes your pre-analyzed single-cell data (supporting Seurat, AnnData, Loom, and more) and generates a Shiny app that can be deployed to the cloud for browser-based access or run locally. No prior experience with Shiny or web development is required (though having some lets you customize certain modules).
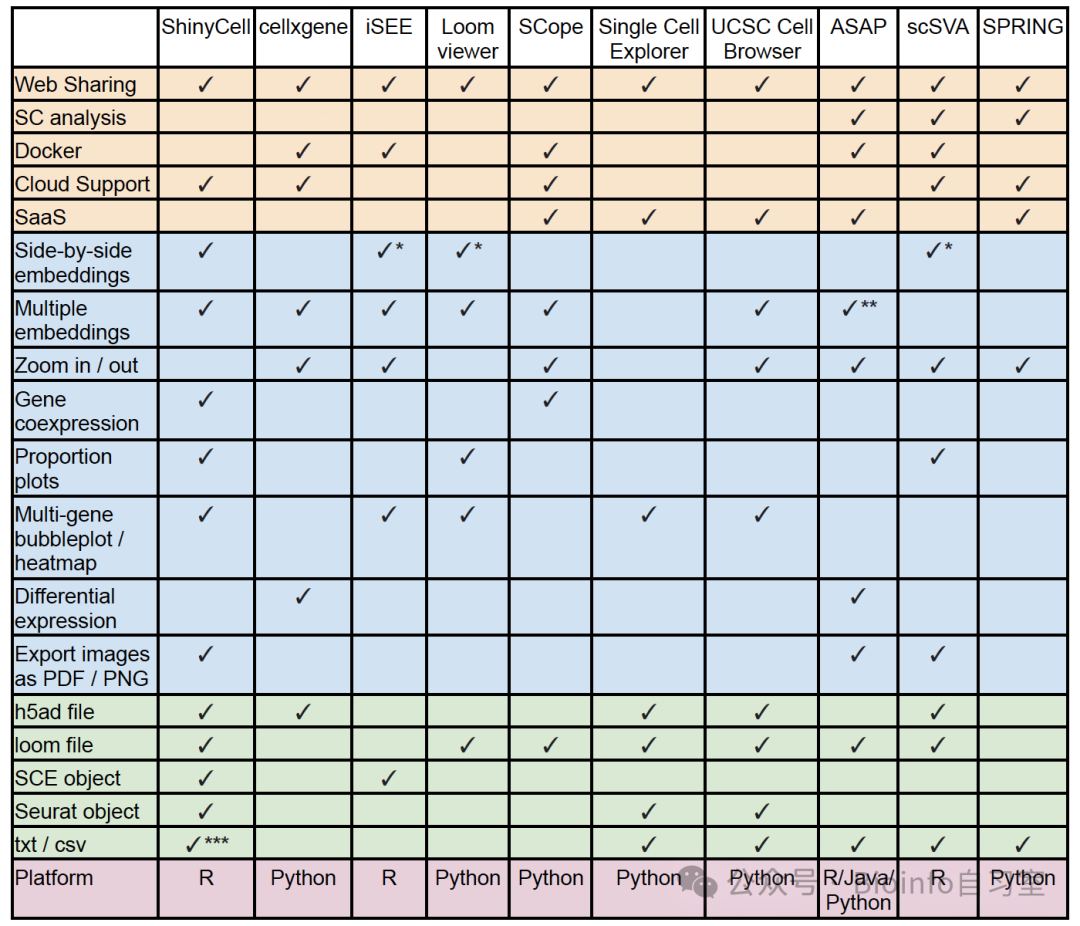 Source: ShinyCell GitHub
💻 Let's Code!
1️⃣ Setup
# As always, install packages first
reqPkg = c("data.table", "Matrix", "hdf5r", "reticulate", "ggplot2",
"gridExtra", "glue", "readr", "RColorBrewer", "R.utils", "Seurat")
newPkg = reqPkg[!(reqPkg %in% installed.packages()[,"Package"])]
if(length(newPkg)){install.packages(newPkg)}
# If you did your analysis in scanpy, install this too:
# reticulate::py_install("anndata")
if(!require("devtools")) install.packages("devtools")
if(!require("shiny")) install.packages("shiny")

# Install ShinyCell
devtools::install_github("SGDDNB/ShinyCell")
⚠️ Having installation issues?
Windows users: don't forget to install Rtools: https://cran.r-project.org/bin/windows/Rtools/
Network issues? You may need a VPN/proxy
Running an old version of R/RStudio? Update first
2️⃣ Generate the Visualization App
library(ShinyCell)
library(Seurat)

# Assume your Seurat object is called 'seu'
# Step 1: Generate configuration
scConf = createConfig(seu)

# Step 2: Generate app files (simple version)
makeShinyApp(seu, scConf,
             gene.mapping = TRUE,     # Enable fuzzy gene name search
             shiny.title = "My Single-Cell Data",  # Page title
             shiny.dir = "myapp")     # Output folder (absolute or relative path)

# Step 3: Run it locally to test
runShiny("myapp")
See the new window that opened in RStudio? Congratulations—your first ShinyCell app is up and running! 🎉
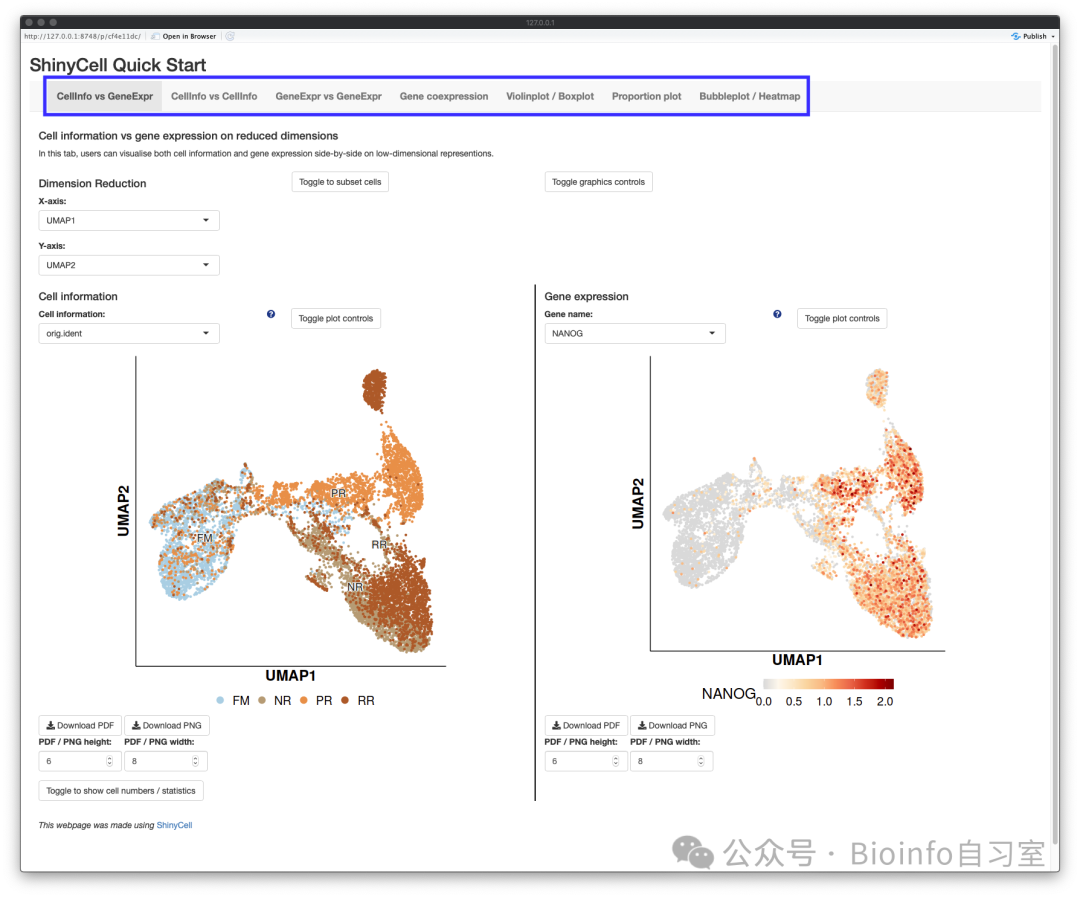 Source: ShinyCell GitHub
3️⃣ Working with Multiple Datasets
ShinyCell also supports visualizing multiple datasets, with each dataset getting its own tab:
library(ShinyCell)
library(Seurat)

# First dataset
# Step 1: Generate configuration
scConf1 = createConfig(seu1)

# Step 2: Generate app files (advanced version)
makeShinyFiles(seu1, scConf1,
                gex.assay = "RNA",        # Which assay to display (use "SCT" if applicable)
                gex.slot = "data",         # Which slot to display
                gene.mapping = TRUE,       # Fuzzy gene name search
                shiny.prefix = "sc1",      # Config file prefix (customizable)
                shiny.dir = "myapp/",      # App output directory
default.gene1 = "EPCAM",                   # Default gene to display (#1)
default.gene2 = "PTPRC",                   # Default gene to display (#2)
default.multigene = c("KRT8", "KRT5", "CD3D", "MS4A1", "DCN"),  # Default multi-gene list
default.dimred = c("UMAP_1", "UMAP_2"))    # Default dimensionality reduction

# Second dataset
scConf2 = createConfig(seu2)
makeShinyFiles(seu2, scConf2,
                gex.assay = "RNA",
                gex.slot = "data",
                gene.mapping = TRUE,
                shiny.prefix = "sc2",
                shiny.dir = "myapp/",
default.gene1 = "EPCAM",
default.gene2 = "PTPRC",
default.multigene = c("KRT8", "KRT5", "CD3D", "MS4A1", "DCN"),
default.dimred = c("UMAP_1", "UMAP_2"))

# Generate the multi-dataset Shiny app code
makeShinyCodesMulti(
  shiny.title = "Multi-Dataset Viewer",
  shiny.prefix = c("sc1", "sc2"),          # Prefixes defined above
  shiny.headers = c("Dataset 1", "Dataset 2"),  # Tab labels
  shiny.dir = "myapp/")                    # Same app path as before

# Step 3: Run locally to test
runShiny("myapp")
🌐 Deploying to the Web (Using shinyapps.io)
Running locally is nice, but it's not very convenient for sharing with collaborators. Your options are either to zip the entire app folder and have them run it in their own RStudio, or physically carry your laptop over to them. Wouldn't it be great to deploy to the web and just share a URL?
Well, you can! shinyapps.io is a platform built by Posit (the company behind RStudio) specifically for deploying Shiny apps. Even better, the free tier lets you deploy up to 5 small apps (under 1 GB each), and unlike other cloud servers, there's no need to configure anything from scratch. More than enough for everyday use.
Step 1: Create an Account
Go to shinyapps.io
Click "Sign Up" and fill in your details
The "FREE" plan is all you need!
After registration, you'll need to grab an API token. Click your avatar (top right) → Tokens → Add Token.
A token entry will be generated. Click Show → Copy to Clipboard to copy the token.
⚠️ About Tokens
shinyapps.io tokens can be viewed repeatedly—you don't necessarily need to save them separately (though it's good practice)
Never leak your token's corresponding secret!
A single token can be reused; you don't need to regenerate one every time
Step 2: Configure the Deployment Tool
# Install the deployment package
install.packages("rsconnect")

# Paste the copied token info into R and run
rsconnect::setAccountInfo(name='user', token='XXXXXXXXXX', secret='XXXXXXXXXX')
Step 3: One-Click Deploy
# Make sure your working directory contains the myapp folder
rsconnect::deployApp("myapp")
📌 Deployment Tips:
Deployment time depends on data size—be patient…
The free tier gives you 25 hours of runtime per month
Want to update? Just redeploy
Save your URL—it's typically
username.shinyapps.io/myapp/
⚠️ FAQ
Running too slowly?
# Try reducing the data:
seu <- DietSeurat(seu)             # Strip unnecessary data
seu <- subset(seu, downsample=5000) # Randomly downsample to 5,000 cells
Deployment failed?
Check your network connection
Verify that the token was pasted correctly
Confirm your working directory contains the target app folder
References
💌 Questions? Want to learn more? Let me know in the comments!
#Bioinformatics #SingleCellSequencing #DataVisualization #RLanguage
Originally posted on WeChat Official Account: bioinfo_studyroom